News

A Guide to the Best Vegan Beauty Brands in the UK
If you have been exploring the world of vegan beauty for a while, you will know how refreshing it feels to discover products that are kind to your skin, the planet, and animals. The clean beauty movement has grown so quickly in the UK, and there is now a whole range of vegan beauty brands that can easily rival anything found on the high street. This guide brings together some of the best vegan beauty brands in the UK, along with a few reflections on the products that have found their way into my own routine. Choosing vegan beauty is not just about trends. For many people, it is about knowing that the products they use every day do not rely on animal testing or animal-derived ingredients. It is also about feeling good in the choices you make, especially when those choices support cruelty free practices and sustainable formulations. Whether you love skincare, makeup, perfume or body care, there are plenty of vegan beauty products out there that perform beautifully without compromising your values. Before we get into the list of favourite brands, let us take a moment to look at something that many people find confusing. The words cruelty free and vegan often get used together, but they are not the same thing. Understanding the difference helps when searching for new cosmetics, especially if you are trying to build a routine that aligns with your ethics. What is the difference between cruelty free and vegan Cruelty free beauty products are never tested on animals. This is the key thing to look for if animal welfare is your priority. Cruelty free means no testing at any stage of the development process, which is why certifications like the Leaping Bunny or Beauty Without Bunnies are so helpful. They offer reassurance that the brand meets recognised standards and supports ethical testing practices. Vegan beauty products contain no animal-derived ingredients. This includes common components like beeswax, lanolin, honey or carmine. A product can be labeled vegan without being cruelty free, and the same applies the other way around. A cruelty free product can still contain animal-derived ingredients. If your goal is to use products that are fully plant-based, you will want to look for the word vegan or check for recognised stamps from groups like the Vegan Trademark or PETA’s approved vegan label. The overlap is significant, as many vegan beauty brands in the UK are also cruelty free, but the distinction matters. Once you understand it, shopping becomes much easier, and you can quickly identify which brands match your personal values. My favourite vegan beauty products Over the years, I have slowly built a small collection of vegan beauty products that feel like firm favourites. Some of them have been long-standing repeat purchases, and others are newer discoveries that have quickly become part of my everyday routine. It is lovely to find items that not only work well but also align with a more mindful and sustainable way of living. In my makeup bag, there are a few items that I return to again and again. My black eyeliner from a vegan beauty brand has been a staple for years. It glides on easily and stays put, even on busy days. The same goes for the nail polishes from a brand that uses plant-based formulas. Their colours are stunning and they dry beautifully. I also have a little trio of vegan perfumes that feel like a treat for day or evening. Each has a delicate fragrance made from naturally inspired notes. More recently, I have been trying an eyeshadow palette that uses mineral pigments. The shades blend softly and work nicely for both daytime and nighttime looks. I have also switched to a vegan face powder that has been praised widely in the clean beauty community. It gives my skin a subtle matte finish without drying it out, which is quite a relief during winter when my skin becomes more sensitive. In the bathroom, my routine has taken on a bit of a coffee theme. A vegan coffee scrub is something I reach for often, especially when I want smoother skin. I also use a similar scrub for the body, made with clean ingredients that leave my skin feeling refreshed. For cleansing, I enjoy a gentle jelly cleanser followed by a nourishing face oil that keeps my skin hydrated and soft. During colder months, I rely on a vegan lip scrub to remove any dryness and keep my lips smooth. What I love most about these vegan beauty products is not just how they perform but how they make me feel. It feels good to know that what I am putting on my skin comes from brands that take their ethics seriously. Many of them use natural ingredients, avoid common irritants, and create products designed with sustainability in mind. There is something very grounding about knowing your beauty routine supports a kinder way of living. Best vegan beauty brands in the UK There are many brilliant vegan beauty brands across the UK, each offering something a little different. Some focus on luxury skincare made with organic ingredients. Others specialise in minimalist makeup, colourful polishes, natural perfume, or upcycled skincare formulations. What unites them is their commitment to animal friendly and plant-based beauty. You will find skincare brands that use cold-pressed oils, botanical extracts and probiotic blends. There are makeup brands known for their high performing vegan formulas and beautiful shade ranges. There are also fragrance houses creating natural scents from sustainable sources. Body care brands are using upcycled coffee grounds, fruit enzymes and natural exfoliants to create products that feel good and do good. Many of these brands offer refillable packaging, small batch production or eco friendly materials. Others concentrate on clean formulations that cut out common harmful ingredients, making them ideal for sensitive skin. The UK vegan beauty space is incredibly diverse, and there truly is something for everyone. Whether you love a simple routine or prefer a full collection of products, you can build a complete beauty regimen using vegan items from trusted UK brands. Makeup, skincare, perfume, hair care, body care and cleansing products can all be found in vegan formulations that work beautifully. FAQs What does vegan beauty mean Vegan beauty refers to cosmetics and skincare products made without any animal-derived ingredients. This includes beeswax, lanolin, honey, collagen and carmine. Vegan beauty products can still vary in formulation, so checking the label or certification is helpful. Are cruelty free and vegan the same They are related but not identical. Cruelty free means the product has not been tested on animals. Vegan means the product contains no animal-based ingredients. Some products are both, but not always. How do I know if a beauty brand is vegan You can look for clear vegan labeling or check for recognised certifications from groups such as the Vegan Trademark or PETA’s approved vegan list. Many brands also list their ingredient sourcing policies on their websites. Why choose vegan beauty products People choose vegan beauty for many reasons. These include supporting animal welfare, avoiding certain allergens, adopting a plant-based lifestyle or choosing more sustainable formulations. Vegan beauty products have also improved significantly in quality over recent years.
Learn more
Laminated Brow Aftercare 101: What to Do (and What to Avoid)
Brow lamination has become one of the most sought-after beauty treatments for achieving fuller, more defined brows. Whether you’ve had your brows laminated at a salon or tried an at-home kit, aftercare plays a vital role in maintaining those sleek, lifted results. The process may give you instantly fluffier brows, but the real secret to keeping them healthy and long-lasting lies in how you care for them afterwards. Understanding what to do and what to avoid after brow lamination ensures your results stay soft, smooth, and perfectly in place. Here’s everything you need to know about laminated brow aftercare, from the first 24 hours to daily upkeep. What Is Brow Lamination Aftercare & Why Is It Important Brow lamination is a chemical process that softens and reshapes your brow hairs, allowing them to be styled into a new direction for a fuller and more polished look. After the treatment, the hair cuticle remains open and flexible, making your brows more vulnerable to external elements like water, heat, or skincare products. This is where aftercare becomes essential. Proper aftercare ensures your brows set correctly in their new shape, prevents dryness or frizz, and helps the treatment last its full duration. Think of it like a freshly styled blow-dry—your brows need time to settle. By treating them gently in the first few days and following a nourishing routine, you’ll maintain that lifted look for up to six to eight weeks. Skipping or ignoring aftercare can cause the brow hairs to dry out or lose their structure. Taking the right steps protects the lamination and keeps your brows strong, conditioned, and healthy. The First 24 Hours: Do’s and Don’ts The first day after your brow lamination is the most crucial period. Your brows are in their most delicate state and need to be treated with extra care to prevent them from losing their shape or becoming damaged. Avoid getting your brows wet, which includes steam from hot showers or saunas. Water can interfere with the lamination solution before it has fully set. Try not to touch, rub, or apply makeup or skincare products near the brow area during this time. Sleeping face-down or on your side can also disturb the shape, so resting on your back is ideal. Instead, let your brows rest and settle. Avoid brushing them until the following day, and resist the urge to over-style them too soon. If possible, stay out of humid environments and avoid excessive sweating from workouts. This short period of restraint helps your brows lock into their new, lifted form for the long term. After 24–48 Hours: Daily Care Routine Once the initial setting period is over, you can introduce a gentle care routine to keep your brows soft and nourished. Hydration is the key to maintaining healthy laminated brows. Start by applying a nourishing brow oil or serum daily. Products rich in natural ingredients like argan oil, castor oil, or vitamin E help restore moisture, strengthen the hair, and promote healthy growth. Massage a small amount into your brows before bed to condition them overnight. When brushing, use a clean spoolie and light pressure to maintain shape without tugging. Always brush in the natural direction of the lamination. This simple habit keeps your brows tidy while avoiding unnecessary stress on the hair. Be mindful of what you apply to your face. Avoid exfoliants, retinol, or acids near your brows, as these can weaken the bonds created during lamination. Stick to gentle cleansers and avoid heavy creams or oils that could affect the lamination’s hold. To prolong your results, space out your treatments by at least six to eight weeks. Giving your brows time to recover between sessions prevents over-processing and keeps the hair strong and flexible. Extra Tips for Long-Lasting Laminated Brows Caring for laminated brows doesn’t have to be complicated. A few small changes to your routine can make a big difference in how long your results last. Sleep on a silk or satin pillowcase to reduce friction and prevent brow hairs from becoming misaligned while you rest. Avoid waterproof brow products that require scrubbing to remove, as harsh cleansing can cause the hair to weaken or break. Instead, choose lightweight, water-based formulas that wash off easily. If you notice your brows starting to feel dry or coarse, apply a conditioning mask or a few drops of nourishing oil in the evening to restore softness. Consistency is key—regular maintenance will keep your brows looking salon-fresh for weeks. Avoid exposure to excessive heat such as saunas, steam rooms, or direct sunlight, as these can dry out the laminated hair. Gently pat your brows dry after cleansing instead of rubbing them with a towel. With steady care, you’ll not only preserve your results but also improve the overall health of your brows, making each lamination look better than the last. Keep Your Brows Healthy Between Treatments Healthy brows are the foundation for flawless lamination results. Between appointments, focus on hydration, gentle cleansing, and a balanced routine that supports hair growth. Incorporate a lightweight brow serum or oil into your nightly skincare routine to replenish nutrients lost from the chemical process. Products containing keratin, biotin, or peptides help repair and strengthen the hair shaft over time. Avoid frequent waxing or plucking, as this can cause thinning and disrupt the uniform appearance of laminated brows. Instead, use a spoolie to shape and tidy your brows daily. A small amount of brow gel can help maintain the desired hold without stiffness. It’s also important to allow your brows to breathe. Give them a break from heavy makeup or gels every few days to avoid product buildup. Staying consistent with your aftercare not only keeps your brows in top condition but also ensures your next lamination treatment takes evenly. For best results, book your next appointment every six to eight weeks, depending on your hair growth cycle. This interval keeps your brows looking naturally full while preventing over-processing. Final Thoughts Laminated brows may look effortless, but the secret to maintaining their shape and shine lies in consistent aftercare. A mindful routine of gentle handling, regular nourishment, and protective habits ensures your laminated brows stay lifted, glossy, and healthy for weeks at a time. Remember, brow lamination is low maintenance, not no maintenance. Taking a few minutes each day to care for your brows will extend the life of your treatment and keep your look fresh and defined. With the right aftercare and products, you can enjoy soft, smooth, and flawless brows that truly frame your face. FAQs What should I avoid after brow lamination? Avoid getting your brows wet for at least 24 hours after treatment. Stay away from steam, saunas, and harsh skincare products around the brow area. How long do laminated brows last? With proper aftercare, your laminated brows can last between six to eight weeks, depending on your natural hair growth and daily care routine. Can I apply makeup after brow lamination? You should wait at least 24 hours before applying any makeup or brow products. Once the setting period is over, you can style your brows as usual using gentle products. Do laminated brows damage natural hair? Not if you follow proper aftercare and give your brows time to recover between treatments. Regular use of nourishing oils or serums helps strengthen the hair and prevent dryness. How soon can I have another lamination treatment? It’s recommended to wait a minimum of six weeks before your next session. This allows the brows to fully recover and ensures healthy, lasting results.
Learn more
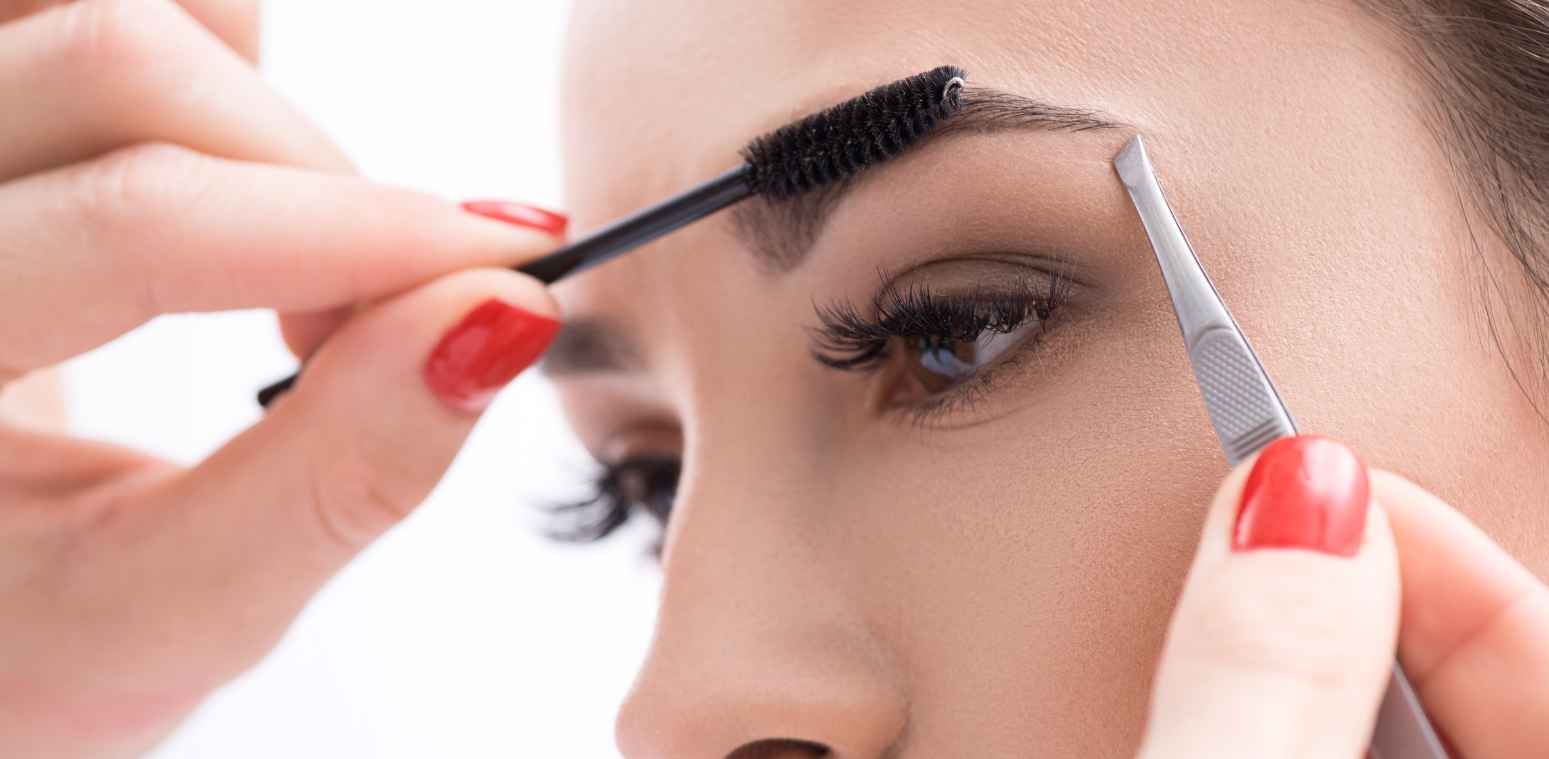
What to Do When Tinting Your Eyebrows Goes Wrong: A Step-by-Step Guide
Tinting your eyebrows is a simple and effective way to enhance your natural features and achieve a more polished, low-maintenance look. But as anyone who’s tried it knows, things don’t always go to plan. Maybe your brows turned out too dark, too uneven, or simply not the colour you were hoping for. The good news is that most eyebrow tinting mishaps are fixable with a calm approach and the right steps. This step-by-step guide will help you correct a tint gone wrong safely and effectively, using simple techniques and gentle products. Stay Calm The first and most important thing to remember when your eyebrow tint goes wrong is not to panic. It’s completely normal to feel frustrated or anxious if your brows look too dark or patchy, but acting impulsively can make the situation worse. Take a moment to breathe and remind yourself that tinting mistakes are temporary. Eyebrow tint usually fades naturally over a few days as the skin renews itself and the colour softens. Most corrections can be done at home with patience and care. Staying calm allows you to assess the situation logically and prevents you from reaching for harsh products that might damage your skin or brow hair. Assess the Situation Before you start correcting the tint, take a close look at your brows under good lighting. Identify what exactly went wrong. Are your brows too dark overall, uneven in patches, or tinted outside the natural shape? Understanding the issue helps you decide the best course of action. If only one area looks darker, you might only need to target that specific spot. On the other hand, if the overall shade is too intense, you’ll need a more general approach to lightening the tint. It’s also worth noting how recent the tinting was—corrections are easiest within the first 24 hours, when the colour is still settling. Act Quickly Timing matters when it comes to fixing eyebrow tinting mistakes. The sooner you address the issue, the easier it is to correct. If you’ve just finished tinting your brows and realise they are darker than expected, start working on them within the first 24 hours. During this window, the colour pigment hasn’t fully bonded to the hair shaft and skin, meaning you can gently remove or lighten it. If you wait too long, the tint will set more firmly and be harder to fade. However, even after the first day, regular cleansing and exfoliation can gradually reduce the colour intensity. Acting promptly simply helps you achieve faster results. Prepare Supplies Before you begin, gather everything you’ll need for safe and effective correction. Having your supplies ready helps you avoid unnecessary stress and ensures you don’t damage your brows by rushing. You’ll need: Cotton pads or soft cloths A gentle make-up remover (preferably oil-free and suitable for sensitive skin) A mild facial exfoliator Lukewarm water A nourishing brow or facial oil for aftercare Optional: a colour corrector or tint remover made specifically for eyebrows Always use gentle, skin-friendly products to avoid irritation. Harsh cleansers or alcohol-based removers can dry out your skin and make the problem worse. Remove Excess Tint If your eyebrow tint is noticeably too dark, the first step is to remove some of the excess colour. Dampen a cotton pad with make-up remover and gently swipe it over the tinted area. Don’t scrub or rub aggressively, as this could irritate your skin or pull out brow hairs. Focus on light, circular motions to lift the colour gradually. If you don’t see immediate results, repeat this process a few times, giving your skin short breaks in between. You can also try a gentle cleanser with micellar water to help lift surface pigment without causing damage. Avoid using bleach, hydrogen peroxide, or any harsh lightening chemicals. While these might seem like a quick fix, they can damage both the skin and brow hair, leaving you with irritation or uneven patches. Patience and gentle care are far safer and more effective. Exfoliate After you’ve removed as much surface tint as possible, mild exfoliation can help fade any residual colour, especially if it’s stained your skin. Choose a gentle facial exfoliator designed for sensitive areas, and use it sparingly—once or twice daily until you see improvement. Apply a small amount using your fingertips and lightly massage over the brows for a few seconds, then rinse with lukewarm water. This process helps remove dead skin cells, encouraging the tint to fade more evenly. Avoid over-exfoliating, as this can lead to redness or flakiness. If your skin feels sore or irritated, stop and allow it to rest before continuing. Once you’ve finished exfoliating, apply a nourishing brow oil or moisturiser to keep the area hydrated. Wait Patiently Sometimes, the best approach is simply to wait. Eyebrow tint naturally fades within a few days as your skin renews itself and oils from your skin gradually break down the pigment. If the colour is only slightly darker than you intended, patience may be all you need. Avoid over-correcting or applying multiple treatments in quick succession. Too many interventions can cause dryness, irritation, or even damage to your brow hairs. Instead, focus on gentle cleansing and moisturising while the tint fades on its own. You’ll likely find that after a few days, your brows look softer and more natural. Seek Professional Help If your brows still look uneven or you’re unsure how to proceed, it’s always wise to seek help from a professional brow specialist or esthetician. They have the tools and experience to correct tinting mistakes safely without compromising your brow health. A professional can assess the tone, determine the best correction technique, and even blend the colour to create a more natural finish. They may also recommend a mild tint remover or colour adjustment treatment suited to your skin type. Reaching out to an expert doesn’t mean you’ve failed—it means you’re protecting your brows from potential damage. Avoid Further Tinting Until Issue Resolved It’s important to resist the urge to fix the problem by applying another tint immediately. Layering more pigment on top can worsen the situation and lead to unnatural colour buildup. Your brows need time to recover before undergoing another chemical treatment. Wait until your current tint has faded completely and your skin feels healthy before considering a new tint. This gives your brows time to regain their natural oils and strength. In the meantime, use a tinted brow gel or powder to soften the appearance if needed. Prevent Future Mishaps Learning from the experience is the best way to avoid repeating it. Always perform a patch test before using any tinting product, even if you’ve used it before. This ensures you’re not allergic to the formula and gives you a chance to preview the colour. Follow the product instructions carefully, paying attention to the recommended processing time. Leaving tint on for even a few minutes longer can result in a much darker outcome. If you’re unsure about mixing ratios or timing, it’s worth booking a professional tinting appointment instead of attempting it at home. Lastly, keep your brows healthy by maintaining a consistent care routine. Regular cleansing, gentle exfoliation, and nourishing oils will keep them strong and ready for future treatments. FAQs Can I lighten my eyebrows immediately after tinting? Yes, but only using gentle methods such as micellar water, make-up remover, or mild exfoliation. Avoid using bleach or strong chemicals, as these can irritate the skin. How long does it take for eyebrow tint to fade naturally? Most tints begin to fade within three to five days and can last up to two weeks depending on your skin type, cleansing habits, and the product used. Is it safe to exfoliate tinted eyebrows? Yes, as long as you use a mild exfoliator designed for sensitive skin. Avoid over-exfoliating to prevent irritation. What should I do if my eyebrow tint is uneven? You can gently remove darker areas using a cotton pad with make-up remover or seek professional help for a colour adjustment. Can I re-tint my eyebrows right away? It’s best to wait at least four to six weeks before re-tinting to allow your brows to recover fully.
Learn more
The Ultimate Guide to Brow Lamination: What to Expect from Your First Treatment
Brow lamination has quickly become one of the most sought-after beauty treatments for creating fuller, more defined brows with minimal effort. If you’ve been wondering about brow lamination and what to expect during your first treatment, you’ve come to the right place. This guide will walk you through everything you need to know, from how the treatment works to the benefits and aftercare tips to keep your brows looking flawless for weeks. What is Brow Lamination? Brow lamination is a semi-permanent beauty treatment that’s designed to straighten and set your brow hairs in place, giving them a fuller and more defined look. The process works similarly to a hair perm, where a solution is applied to soften the natural brow hairs, allowing them to be shaped and set in the desired direction. Whether you're aiming for sleek and polished brows or the ever-popular fluffy look, brow lamination makes it possible without the need for daily maintenance. The best part about brow lamination is its ability to tame unruly brows and fill in sparse areas, creating a uniform and lifted appearance. The results typically last for 6-8 weeks, depending on your hair type and aftercare routine. How Does Brow Lamination Work? The process of brow lamination is simple and non-invasive, and it typically takes around 30-45 minutes to complete. Here’s a step-by-step breakdown of what you can expect during your brow lamination appointment: Step-by-Step Brow Lamination Process Consultation: Your brow artist will begin by assessing your natural brow shape and discussing the desired look. They’ll work with you to determine whether you want a smooth, defined brow or a fuller, fluffier look. Cleansing: Before the treatment starts, your brow area will be thoroughly cleaned to remove any makeup, oils, or dirt. This ensures the products used during the treatment are applied evenly. Step 1 – Perming Solution: The first step in the process is applying a perming solution to the brows. This helps break down the natural bonds in the hair, making it flexible enough to be reshaped. The perming solution is left on for a few minutes, depending on the type of brow hair (thicker hair may need a longer processing time). Step 2 – Setting the Brows: Once the perming solution is removed, the brow hairs are brushed into the desired shape. This is where the magic happens: your brows are styled to achieve the perfect look, whether you want them sleek or voluminous. Step 3 – Neutraliser: A neutralising solution is then applied to set the brows in their new shape. This process locks the hairs in place and ensures they stay in their new position. Step 4 – Nourishing Treatment: To finish the treatment, a nourishing serum or oil is applied to the brows. This helps to condition the hairs, ensuring they stay soft, shiny, and healthy after the treatment. The Benefits of Brow Lamination Brow lamination offers a range of benefits that make it a top choice for those looking to enhance their brows. Whether you have sparse, unruly brows or want to achieve a more defined shape, brow lamination delivers outstanding results with minimal effort. Fuller Brows One of the most significant benefits of brow lamination is its ability to give the appearance of fuller brows. The process smooths out the hairs and lifts them into place, helping to fill in any sparse areas. Whether your brows are thin or patchy, brow lamination creates a fuller, more uniform look. Flawless Shape Brow lamination helps to create a flawless, uniform shape by repositioning each hair to lie in the same direction. This is particularly beneficial for people with brows that grow in different directions or have gaps. By setting the hairs in place, brow lamination creates a sleek and smooth look that is easy to maintain. Long-Lasting Results Unlike traditional brow shaping methods that require frequent touch-ups, brow lamination offers long-lasting results. Once treated, your brows can stay in place for 6-8 weeks, allowing you to enjoy hassle-free, perfectly styled brows without the need for daily grooming or the use of brow gels and pencils. No Need for Daily Maintenance With brow lamination, you can say goodbye to the daily struggle of filling in your brows or using gels to keep them in place. Once laminated, your brows stay in shape for weeks, cutting down your grooming routine significantly. Customisable Look Brow lamination is highly customisable, so you can achieve the exact look you desire. Whether you prefer sleek, tamed brows or the trendy fluffy brow look, your brow artist will tailor the treatment to suit your individual style. How to Prepare for Your First Brow Lamination Appointment To ensure the best results from your brow lamination treatment, there are a few steps you should take in preparation. Avoid Tweezing or Waxing In the days leading up to your appointment, refrain from tweezing, waxing, or threading your brows. The more natural hair growth you have, the better the brow artist can work with your brows to create the perfect shape. No Makeup on the Day Make sure to arrive at your appointment with clean skin, and avoid wearing makeup around your brows. This ensures that the products used during the treatment can penetrate the hair more effectively. Avoid Moisturisers Avoid applying moisturisers or oils to your brow area on the day of your appointment. These products can interfere with the treatment and prevent the lamination solution from working as intended. Share Any Skin Concerns If you have any allergies, sensitivities, or recent skin treatments (such as chemical peels or laser treatments), make sure to inform your brow artist before the treatment. This will help them tailor the treatment to your skin’s needs and ensure a safe and comfortable experience. Aftercare Tips After your brow lamination treatment, following proper aftercare is essential to maintain the results and keep your brows looking their best. Avoid Getting Your Brows Wet For the first 24-48 hours after your treatment, avoid getting your brows wet. This allows the lamination solution to fully set and ensures long-lasting results. Skip Makeup and Brow Products For the first day or two, skip makeup and any brow products such as gels or pencils. This allows the brow hairs to settle and maintain their new shape without interference. Brush Your Brows Daily To keep your brows looking neat and styled, brush them daily using a spoolie brush. This helps to maintain the shape and ensures that the hairs stay in place. Use a Nourishing Brow Serum Using a nourishing brow serum can help to keep your brows healthy and conditioned between appointments. These serums are designed to hydrate and strengthen the brow hairs, promoting long-term growth and vitality. Final Thoughts Brow lamination is an excellent treatment for anyone looking to achieve fuller, more defined brows with minimal effort. It’s quick, painless, and the results are long-lasting, giving you hassle-free brows for weeks. Whether you’re looking for a sleek, polished look or a trendy fluffy brow, lamination can help you achieve the perfect shape and fullness. If you’re ready to transform your brows, make sure to follow the preparation and aftercare tips to get the best results from your first brow lamination appointment. FAQs Is Brow Lamination Safe? Yes, brow lamination is a safe and non-invasive treatment. However, it’s essential to go to a trained professional to ensure the procedure is performed correctly and safely. How Long Does Brow Lamination Last? Brow lamination typically lasts between 6-8 weeks, depending on your hair type and aftercare. Can I Do Brow Lamination at Home? While there are at-home brow lamination kits available, it’s always recommended to seek professional treatment to ensure the best results and avoid any risks. Will Brow Lamination Make My Brows Look Too Thick? Brow lamination creates a more defined and fuller look but does not make brows unnaturally thick. The treatment enhances your natural brow shape and adds volume where needed.
Learn more
How Often Can I Have a Lash Lift? The Do’s and Don’ts for Healthy, Beautiful Lashes
A lash lift is one of the most popular beauty treatments for enhancing natural lashes without extensions. It gives your lashes a lifted, curled look that opens up the eyes and adds definition. But like any chemical-based treatment, knowing how often to repeat it is key to keeping your lashes strong and healthy. Timing, aftercare, and patience all play a big role in achieving beautiful, long-lasting results. 1.1 Introduction: Understanding Lash Lifts and Why Timing Matters A lash lift works by reshaping your natural lashes using a gentle lifting solution. This gives the appearance of longer, thicker, and more defined lashes that last for weeks. However, each lash has its own growth cycle, and lifting them too frequently can cause damage or weakening over time. Allowing your lashes to rest between treatments ensures that new, healthy lashes can grow and that existing ones remain strong. Understanding how long to wait between lifts—and how to care for them afterward—is essential for maintaining the best results. 1.2 How Often Can I Have a Lash Lift? Most lash lifts last between six to eight weeks, depending on your natural lash growth and how well you follow aftercare advice. The lifted effect starts to fade as new lashes grow in and old ones shed naturally. It’s best to wait until the full lash cycle is complete before having another treatment. Getting a lash lift too soon can weaken or over-process your lashes. Waiting at least eight weeks between appointments gives your lashes time to recover, keeping them healthy, flexible, and ready for the next lift. 1.3 The Wait Period: Why at Least 8 Weeks Is Recommended Your lashes go through three stages of growth: anagen (new growth), catagen (transition), and telogen (resting). A full cycle usually takes six to eight weeks. If you lift your lashes again before they’ve completed this process, you risk damaging new growth and causing brittleness. By waiting at least eight weeks, you give your lashes the time they need to renew naturally. This not only prevents breakage but also ensures that your next lash lift produces an even, smooth curl across all lashes. The Do’s of Lash Lift Aftercare To keep your lash lift looking its best and extend its lifespan, it’s important to follow proper aftercare. Small habits make a big difference in how long your results last. Be Gentle with Your Lashes Treat your lashes with care. Avoid rubbing your eyes or tugging at your lashes, especially in the first few days after the treatment. Rough handling can cause them to lose their shape prematurely. Avoid Water and Makeup for the First 24 Hours Keep your lashes completely dry for the first day after your lift. Exposure to water or makeup too soon can weaken the lifting solution and affect the curl. Wait at least 24 hours before washing your face, swimming, or applying mascara. Use a Lash Conditioner or Serum Just like the hair on your head, your lashes benefit from hydration. Apply a nourishing lash conditioner or growth serum regularly to strengthen and maintain softness. Look for formulas enriched with keratin, peptides, or natural oils that support lash health. Sleep on Your Back If possible, sleep on your back to avoid pressing your lashes against the pillow. Sleeping face-down can cause them to bend out of shape or lose their curl faster. The Don’ts of Lash Lift Aftercare While it’s tempting to go straight back to your usual routine, a few small things can undo your results. Avoid the following to help your lashes stay lifted and healthy. Don’t Get Another Lift Too Soon Spacing out treatments is crucial. Having another lash lift before eight weeks can cause over-processing, which leaves lashes brittle and prone to breakage. Always wait until your lashes have grown out fully. Avoid Heavy Oil-Based Products Oils can break down the lifting solution and cause the curl to drop prematurely. Avoid oil-based cleansers, eye creams, and removers. Opt for gentle, water-based products instead. Don’t Use Waterproof Mascara Immediately Waterproof mascaras are difficult to remove and often require harsh rubbing or oil-based removers. These can damage both the curl and the lashes themselves. If you want to use mascara, choose a lightweight, water-based formula. Avoid Excessive Heat (Saunas, Hot Showers) Prolonged exposure to heat and steam can soften the lash lift and reduce its longevity. Avoid hot saunas, steam rooms, or long hot showers for at least two days after your treatment. Why Having a Lash Lift Too Soon Can Damage Your Lashes Lash lifts are designed to be gentle, but overdoing them can harm the delicate lash hairs. Rushing into another session too quickly leads to several issues: Weakening of Lashes from Frequent Treatments Each lash lift uses a mild chemical solution to reshape the hair. When done too often, this weakens the hair’s structure, leaving it fragile and prone to breakage. Over-Processing and Brittle Lashes Just as hair can become dry from over-bleaching, over-processed lashes lose elasticity and shine. This can cause them to become stiff or even fall out prematurely. Poor Lift Results When Lashes Are Not Fully Recovered If lashes haven’t completed their growth cycle, they may not hold the lift properly. The result is often uneven or inconsistent curling, reducing the overall effect. Allowing your lashes to recover naturally is the best way to maintain both the health and beauty of your eyes. Patience always delivers better, longer-lasting results. Conclusion and Call to Action A lash lift is a fantastic way to achieve beautiful, low-maintenance lashes that enhance your natural features. However, maintaining their health requires balance and care. The key is to wait at least eight weeks between treatments, treat your lashes gently, and follow proper aftercare routines. Healthy lashes not only look better but also respond more effectively to future treatments. By giving your lashes time to rest and nurturing them with conditioning products, you can enjoy lifted, defined lashes without compromising their strength. Whether you’re new to lash lifts or a regular fan of the treatment, remember that consistency, care, and patience go hand in hand with beauty. When you prioritise lash health, the results speak for themselves — naturally curled, glossy, and effortlessly elegant lashes every time. Frequently Asked Questions 1. How long does a lash lift last? A lash lift typically lasts between six to eight weeks, depending on your natural lash growth and aftercare routine. 2. Can I wear mascara after a lash lift? Yes, but wait at least 24 hours before applying any makeup. Choose water-based mascaras for easier removal and longer-lasting results. 3. Is it safe to have a lash lift frequently? Yes, as long as you wait a minimum of eight weeks between treatments. This prevents over-processing and keeps your lashes healthy. 4. How can I make my lash lift last longer? Avoid water, steam, and heavy oils for the first 24 hours. Use a lash serum and handle your lashes gently. 5. Can I combine a lash lift with a tint? Yes, tinting can be safely done during the same appointment, but always ensure your lashes are healthy and strong before combining treatments.
Learn more
How to Cover Grey Brows and Thicken Sparse Areas
Eyebrows shape your face, frame your eyes, and express emotion. They can completely transform how you look — adding balance, structure, and confidence. However, as time goes on, many people notice their brows beginning to change. The once full, defined arches may start to look lighter, thinner, or uneven. These changes are completely natural, but they can leave you wondering how to restore colour and volume without making them look overdone. This guide explains why brows turn grey or sparse and how you can revive them easily using simple products and techniques that work for everyone. 1.1 Introduction: Why Brows Matter and How They Change with Age Eyebrows are more than just facial hair — they highlight your features, create symmetry, and can make you appear more awake and youthful. As we age, our hair growth patterns change, and our brows can lose their natural pigment and density. While it’s completely normal, the loss of colour or fullness can affect how you feel about your appearance. Updating your brow care routine helps maintain definition, boosts confidence, and ensures your brows continue to enhance your natural beauty. 1.2 What Causes Brows to Turn Grey? Grey eyebrows are caused by a gradual reduction in melanin — the pigment that gives hair its colour. As we age, melanin production naturally slows, leading to lighter, greyer strands. Genetics play a large part in determining when this starts. Some people may spot grey eyebrow hairs in their twenties, while others may not notice changes until later in life. Environmental factors such as stress, diet, and overall health can also contribute. Although grey brows are a normal sign of ageing, they can make the face appear less defined. Using tinted gels or brow products can instantly bring back warmth and contrast without the need for dyeing or professional treatments. 1.3 Why Do Brows Become Thinner? Eyebrows tend to thin over time for a number of reasons. The good news is that once you understand the cause, you can take simple steps to improve their appearance and even encourage regrowth. Over-Plucking Years of over-tweezing can damage hair follicles and prevent regrowth. Many people who followed thin brow trends in the past find their brows don’t grow back as easily. Gentle grooming and letting your brows rest between shaping sessions can make a noticeable difference. Ageing The natural ageing process affects every part of the body, including hair. As follicles weaken, they produce finer strands or stop growing altogether. This leads to a thinner, softer brow appearance. Hormonal Changes Fluctuations in hormones, such as oestrogen and thyroid levels, can influence hair growth. These shifts, which are common during menopause or pregnancy, can lead to sparse or uneven brows. Stress Stress has a direct impact on hair growth cycles. High levels of stress hormones can cause shedding or slow regrowth. Managing stress through rest and relaxation can support healthier hair overall. Skin Conditions Conditions like eczema, dermatitis, or psoriasis can irritate the skin around the brows and hinder healthy hair growth. Treating underlying skin concerns helps maintain a healthy foundation for fuller brows. Tinted Eyebrow Gel – A Simple, Effective Solution One of the easiest ways to restore definition and cover grey hairs is to use a tinted eyebrow gel. It offers instant results without the need for harsh dyes or complicated routines. A good quality brow gel tints, fills, and thickens brows while keeping them in place all day. The formula should be lightweight, waterproof, and smudge-resistant to withstand daily wear. Many are designed to last for several days without needing touch-ups. For those with sensitive skin, look for a gel that’s free from parabens, oils, and silicones. Vegan and cruelty-free options are also widely available. These products enhance natural brows while maintaining a comfortable, skin-friendly finish. How to Use the Eyebrow Gel Applying a brow gel correctly can make all the difference. Here’s how to get the best results. 3.1 Step 1 – Prepare Brows (Ensure Dry, Oil-Free) Start by making sure your eyebrows are clean and free from oils or creams. This helps the gel adhere better and last longer. 3.2 Step 2 – Apply with Angled Brush Take a small amount of gel on an angled brush and fill in any sparse areas using light, short strokes. Follow your natural shape to keep the look soft and natural. 3.3 Step 3 – Groom with Spoolie Use the spoolie side of your brush to blend and distribute the product evenly. This softens any harsh lines and ensures the brows look full yet natural. 3.4 Step 4 – Removal (Oil-Based Cleanser) When you’re ready to remove it, use an oil-based cleanser. Gently massage the area until the gel breaks down, then rinse with warm water. This ensures all residue is removed without damaging brow hairs. Frequently Asked Questions / Help Section 1. Can I use eyebrow gel if I have very few brow hairs? Yes. Tinted gels adhere to both skin and hair, creating the illusion of fuller brows even in sparse areas. 2. How long does a tinted brow gel last? Most high-quality gels last up to three days, depending on how often you touch or cleanse the area. 3. Is eyebrow gel suitable for sensitive skin? Yes, as long as you choose a gentle, fragrance-free formula. Look for vegan or hypoallergenic options. 4. What’s the best way to choose a shade? Choose a colour that closely matches your natural hair or is one shade lighter for a softer look. 5. Can I apply other brow products on top? Yes. You can use pencils or powders over the gel to add extra shape or detail if desired. Conclusion / Call to Action Grey and thinning brows are a natural part of life, but they don’t have to impact how you feel about your appearance. With the right products and a simple daily routine, it’s easy to restore definition and shape while keeping a natural look. A good tinted eyebrow gel offers a quick, reliable way to fill gaps, cover greys, and keep your brows looking neat and youthful. Combined with healthy grooming habits and gentle care, it can make a noticeable difference in both appearance and confidence. Take a few minutes to care for your brows — small changes can have a big impact on how you look and feel every day.
Learn more
Is Eyelash Lamination Safe During Pregnancy? Everything You Need to Know
During pregnancy, many women focus on maintaining their beauty and wellness routines, but it’s understandable that safety becomes a top priority during this special time. One common beauty treatment that many pregnant individuals consider is eyelash lamination. This procedure promises beautifully curved, natural-looking lashes without the need for mascara or extensions. But the big question is: Is it safe to undergo eyelash lamination during pregnancy? In this blog, we’ll dive into the safety considerations surrounding eyelash lamination during pregnancy, helping you make an informed decision about whether it’s right for you. Understanding Eyelash Lamination Overview of the Procedure Eyelash lamination is a treatment designed to lift, curl, and shape your natural lashes. It is often referred to as a "lash lift" and involves applying a special solution to your lashes, which helps to reshape them. Unlike lash extensions, which involve attaching synthetic lashes to your natural ones, eyelash lamination works with your own lashes, giving them a natural lift and curl. The procedure typically takes around 45 minutes to an hour and provides results that can last anywhere from 6 to 8 weeks. It’s often combined with an eyelash tint to add extra definition, but the lash lift itself is the core part of the treatment. Duration and Maintenance Once the procedure is completed, the results should last for several weeks. However, just like with any beauty treatment, maintenance is necessary to ensure the longevity of the lift. It’s recommended that you avoid getting your lashes wet for the first 24 hours after the treatment. This is to allow the setting solution to fully take effect. During the following weeks, it’s important to keep your lashes hydrated and avoid rubbing or pulling on them to maintain their lifted appearance. Regular touch-ups may be required every 6 to 8 weeks to keep your lashes looking their best. Pregnancy and Hormonal Changes Impact of Pregnancy Hormones on Skin and Hair Pregnancy brings about significant changes in the body due to hormonal fluctuations. These changes can affect the skin and hair, including the health and appearance of your eyelashes. During pregnancy, estrogen levels rise, which can lead to fuller, longer lashes. This can initially sound promising for eyelash lamination, as your lashes may grow longer and appear thicker, making them more receptive to the treatment. However, while estrogen can boost lash growth, hormonal changes can also lead to more unpredictable results. For some, hormones may cause their lashes to become more delicate or fall out faster than usual, potentially affecting the longevity of the lift. Variability of Results During Pregnancy The results of an eyelash lamination procedure can vary during pregnancy due to hormonal fluctuations. While some people may experience a more intense curl or longer-lasting results, others may find that their lashes don’t hold the lift as well or that the treatment fades quicker than usual. This variability can make it difficult to predict how effective the treatment will be. For example, during the first trimester, the effects of hormonal shifts are more pronounced, potentially causing unexpected lash loss or minimal lifting. In contrast, later in pregnancy, when hormones have stabilised, the treatment may yield more predictable results. It’s important to note that every pregnancy is unique. What works well for one person might not work the same for someone else, making it crucial to consider how your body typically responds to hormonal changes before deciding on the treatment. Safety Considerations Skin Sensitivity and Allergic Reactions During pregnancy, your skin can become more sensitive due to hormonal changes. This increased sensitivity can lead to a higher risk of allergic reactions to the products used in eyelash lamination, such as the lash lift solution or adhesive. While allergic reactions to eyelash lamination products are rare, it’s important to be aware that pregnancy can make your skin more prone to irritation. If you have sensitive skin or have experienced allergic reactions to similar treatments in the past, it’s a good idea to speak with your beauty professional before undergoing eyelash lamination. A patch test is highly recommended to check for any adverse reactions to the products. Importance of Patch Testing Patch testing is an essential part of the eyelash lamination process, particularly during pregnancy. This simple test involves applying a small amount of the treatment products to a discreet area of your skin (usually behind your ear or on your wrist) and leaving it for 24-48 hours. If any redness, irritation, or swelling occurs, it indicates that you may be allergic to the products, and the treatment should be avoided. For pregnant individuals, patch testing is especially important as hormonal changes can increase the likelihood of skin sensitivity. Always consult with your beauty technician and ensure a patch test is carried out to reduce the risk of an allergic reaction. Professional Recommendations Guidance from Beauty Professionals Before making any decision about eyelash lamination during pregnancy, it’s best to consult with a trained beauty professional who can assess your individual needs and concerns. Beauty professionals are well-versed in the different factors that can affect the treatment, and they will be able to recommend whether eyelash lamination is suitable for you, based on your skin type, health, and the stage of your pregnancy. Additionally, it’s important to choose a reputable salon that uses high-quality, safe products to ensure the treatment is performed correctly. Make sure to communicate openly with your technician about your pregnancy and any concerns you may have regarding the safety of the procedure. Importance of Consulting Healthcare Providers While beauty professionals are knowledgeable about the procedure itself, consulting your healthcare provider is essential when considering eyelash lamination during pregnancy. Your doctor or midwife can provide guidance on whether the procedure is safe based on your medical history and any potential risks. Pregnancy is a time when extra caution is required, and your healthcare provider can offer personalised advice to help you make the best decision for your health and safety. Conclusion Eyelash lamination during pregnancy involves considering various factors, including the stage of pregnancy, hormonal changes, and individual skin sensitivity. While many pregnant individuals can safely undergo the procedure, it is essential to prioritise health and consult both beauty professionals and healthcare providers before making a decision. Every pregnancy is unique, and what works for one person might not work for another. If you’re in the early stages of pregnancy or have concerns about skin sensitivity or allergic reactions, it’s best to wait until after your first trimester. And remember, always err on the side of caution. Your health and well-being are the most important considerations. FAQs on Eyelash Lamination During Pregnancy Is eyelash lamination safe during the first trimester of pregnancy? While there is no definitive answer, many professionals recommend waiting until after the first trimester to undergo eyelash lamination. This is because the first trimester involves significant hormonal changes, and the skin may be more sensitive, increasing the risk of irritation or unpredictable results. Can eyelash lamination cause any harm to the baby? Generally, eyelash lamination is considered safe during pregnancy, especially when performed by a trained professional. However, because the procedure involves products that come into direct contact with the skin, it’s important to consult your healthcare provider before going ahead. What should I do if I experience an allergic reaction to the treatment? If you experience any signs of irritation or an allergic reaction, such as redness, swelling, or itching, immediately remove the products and seek medical advice. Always perform a patch test before the procedure to minimise the risk of an allergic reaction. How long will the results of eyelash lamination last during pregnancy? The results of eyelash lamination during pregnancy may vary depending on hormonal fluctuations. While some individuals may experience longer-lasting results, others may find that the lift fades more quickly or that their lashes don’t hold the shape as well. It’s important to keep this in mind when deciding on the treatment.
Learn more
What Causes Dark Circles Under The Eyes? And How To Reduce Them in Less Than 60 Seconds
Dark circles under the eyes are a common concern for many people. These shadows can make you look tired, older, or unwell, affecting your overall appearance. While they are a natural part of aging and can happen to anyone, the good news is that there are ways to reduce their appearance quickly and effectively. In this guide, we’ll explain the causes of dark circles, how you can prevent them, and some simple treatments to help you look refreshed. Introduction Dark circles are areas under the eyes that appear darker than the rest of the skin. The colour of these circles can range from purple to black to brown, depending on your skin tone. Some individuals may experience dark circles occasionally, while others have them more persistently. Many people assume that dark circles are simply caused by a lack of sleep. However, several other factors contribute to their development, including lifestyle, allergies, and even genetics. Understanding these causes can help you manage and reduce dark circles effectively. Causes of Dark Circles Age As you age, the skin under your eyes naturally becomes thinner. This makes the blood vessels in that area more noticeable, leading to a darker appearance. The skin around the eyes is the thinnest on the body, and as collagen production decreases with age, it becomes even more delicate and prone to showing blood vessels and shadows. Fatigue One of the most common causes of dark circles is fatigue. When you don't get enough sleep, the skin under your eyes can become paler, and the blood vessels beneath the skin become more visible. Lack of rest can also lead to fluid retention, which can make puffiness worse, creating a more pronounced shadow under the eyes. Allergies Seasonal allergies are another culprit behind dark circles. When you suffer from allergies, your body releases histamines that cause inflammation and congestion. This congestion can affect circulation around your eyes, causing blood vessels to dilate and making the dark circles more prominent. Additionally, the rubbing of your eyes due to irritation can worsen the situation. Medications Certain medications can lead to dark circles as a side effect. For instance, some drugs may cause blood vessel dilation or skin thinning, which can make dark circles more visible. If you suspect that your medication is contributing to the appearance of dark circles, it’s advisable to speak with your healthcare provider. Dehydration When your body is dehydrated, your skin can appear dull and sunken, and the area around your eyes is particularly vulnerable. Dehydration causes the skin to lose its natural plumpness, making dark circles appear more pronounced. Drinking enough water each day can help keep the skin around your eyes looking healthy and smooth. Genetics Dark circles can also run in families. If your parents or grandparents had dark circles, you may be more likely to develop them as well. In some cases, the skin under the eyes may simply be more prone to pigmentation or a thinner structure, making dark circles more visible. Anemia Anemia, or iron deficiency, can cause your skin to appear pale, which makes dark circles more noticeable. When your blood doesn’t have enough red blood cells to carry oxygen, your body compensates by making you look more drained. If you suspect that you have anemia, a simple blood test can confirm the condition, and your doctor can advise you on treatment. Lifestyle Factors Your daily habits play a significant role in the appearance of dark circles. Drinking excessive alcohol, smoking, and high levels of stress can all contribute to the formation of dark circles. Alcohol dehydrates the body, while smoking decreases blood flow and weakens the skin's elasticity. High stress levels can lead to poor sleep, further aggravating the problem. Prevention Tips While some factors like genetics and aging can’t be controlled, there are several lifestyle changes and habits you can adopt to prevent or reduce dark circles under your eyes. Sleep The NHS recommends that healthy adults aim for 7-9 hours of sleep each night. Adequate rest not only reduces the visibility of dark circles but also helps your body repair itself. If you're not getting enough sleep, your skin becomes paler, and blood vessels under the eyes become more visible. Try to prioritise rest and establish a regular sleep routine for the best results. Diet Eating a balanced diet rich in iron, vitamins C, and B12 can help improve your skin’s appearance. Foods like leafy greens, citrus fruits, and berries are all excellent choices. Staying hydrated by drinking plenty of water is also crucial in reducing puffiness and dark circles. Sun Protection Protecting the delicate skin around your eyes from the sun is essential. Apply sunscreen with an SPF of at least 30 every day, even on cloudy days or when you’re indoors. Use a sunscreen specifically formulated for sensitive skin and make sure to reapply every two hours or more frequently if you’re sweating or swimming. Stress Management Chronic stress can worsen dark circles by disrupting your sleep and causing fluid retention. Try relaxation techniques such as yoga, meditation, or deep breathing exercises to manage stress. Using a cold compress under your eyes can also help reduce swelling and blood vessel dilation, making dark circles less noticeable. Lifestyle Adjustments Limiting alcohol consumption and quitting smoking can greatly improve the appearance of your under-eye area. Smoking constricts blood flow, which can worsen the appearance of dark circles. Alcohol, on the other hand, is dehydrating and can make your eyes appear puffier and more tired. Reduce Eye Strain If you spend a lot of time in front of a computer screen, your eyes can become strained and fatigued, causing blood vessels under the eyes to enlarge. Make sure to take regular breaks from your screen, following the 20-20-20 rule: every 20 minutes, look at something 20 feet away for 20 seconds. Treating Underlying Health Conditions Conditions such as eczema, asthma, and melasma can contribute to dark circles. If you have one of these conditions, managing it with the help of your doctor can help alleviate the severity of dark circles. Treatment Options If you’re already dealing with dark circles, there are several ways to treat them and reduce their appearance effectively. Daytime Routine Hydrate and Colour Correct: Start by hydrating your skin with a moisturiser. Next, use a product that provides instant results, firming the skin and smoothing fine lines, wrinkles, and dark circles. Look for ingredients such as retinol, hyaluronic acid, and vitamins A, C, and E to brighten and tighten the skin around your eyes. Apply Concealer: After using your hydrating and wrinkle-reducing products, apply concealer to brighten the under-eye area. Use a small amount and blend it gently with your finger or a makeup sponge. Remember, less is more when it comes to concealer under the eyes. Nighttime Routine Use a Retinol Eye Cream: Retinol is a powerful ingredient that helps to reduce the appearance of fine lines, wrinkles, and dark circles. Incorporating a retinol-based eye cream into your evening skincare routine can help minimize puffiness and dark circles over time. Always apply sunscreen during the day as the skin can become sensitive to retinol. FAQs on Dark Circles Under the Eyes Can dark circles go away? Yes, dark circles can be reduced or even faded with proper lifestyle changes, skincare, and makeup techniques. However, they may not completely disappear, especially if they are hereditary. If you’re not seeing results, you may want to consult with a dermatologist for more advanced treatments. Who is most prone to dark circles? Anyone can experience dark circles, but people with thinner skin, higher melanin levels, or a family history of dark circles are more likely to develop them. Additionally, older adults and those with certain medical conditions may also be more prone. What home remedies can help with dark circles? A simple home remedy involves placing a cold spoon under your eyes. The cold helps to reduce blood vessel dilation and alleviate puffiness. You can also use a cold compress to achieve similar results.
Learn more
How to Use Brow Gels
Brows have a remarkable impact on the way your face looks. Even on days when you wear no makeup, well-groomed brows can make your whole appearance seem more polished and lifted. A simple brush-through with brow gel can instantly define your features, tidy stray hairs, and bring structure to your face with minimal effort. Whether you prefer a soft, natural look or bold, brushed-up brows, brow gel is one of the easiest products to master. It works as a flexible styling tool, allowing you to experiment with texture and shape while keeping your brows neat all day. From simple grooming to laminated finishes, there are many ways to apply brow gel to create the look you want. Here’s a complete guide on how to use brow gels, with easy step-by-step techniques for both clear and tinted formulas. 3 Easy Looks with Clear Brow Gel Best Clear brow gel is the ultimate everyday essential. It’s lightweight, versatile, and perfect for every hair colour and skin tone. Designed with a micro brush for precision, it grips even the finest brow hairs, shaping them neatly without leaving residue or stiffness. Clear formulas are ideal for those who prefer a natural, minimal look but still want definition. Below are three effortless styles you can achieve using clear brow gel. The Basic Brow Groom Description / Aim: The simplest way to use brow gel is to neaten your brows while maintaining their natural shape. This style suits anyone who wants clean, tidy brows without changing their overall look. Instructions: Start by brushing your brows from the inner corner outward, following their natural direction. If you prefer a slightly lifted look, comb the front section upwards and the rest across the brow line. Make sure every hair is lightly coated with product. Once in place, let the gel set for a few seconds. This will keep your brows held and groomed for hours, giving you a soft, polished finish. This method works perfectly for quick touch-ups or days when you want your brows to look effortlessly defined. Laminated Look Description / Aim: This technique mimics the professional laminated brow effect — sleek, glossy, and perfectly set in place. The goal is to make the brows appear fuller and flatter against the skin for a high-shine, lifted result. Instructions: Apply a generous amount of clear brow gel, brushing it back and forth through the hairs to ensure even coverage. Then, use your fingertips to press and smooth the brows flat against the skin. This helps the gel act like a gentle adhesive, giving a laminated effect that lasts throughout the day. For extra control, you can use a spoolie or brow comb to shape the hairs into your desired direction while the product is still slightly damp. Once dry, the brows will remain firm but flexible, creating that clean, editorial-style finish. A Feathered Fluffy Brow Description / Aim: This style gives a textured, lifted effect that looks natural yet modern. Feathered brows are all about creating volume while keeping a soft and airy feel. Instructions: Begin by applying clear brow gel and brushing the hairs upwards rather than sideways. Don’t worry if some hairs start to fall back into place — allow the gel to dry for a few seconds before brushing again. You can keep the inner section of the brows brushed up for height and let the tails follow a softer, natural angle. To enhance texture, make sure the brows are well coated with product before shaping. Once set, this look opens up the face and adds a subtle lift, making it ideal for both daytime and evening makeup. Using Tinted Brow Gel If you want colour as well as control, tinted brow gel is a perfect choice. It combines the grooming benefits of clear gel with a subtle tint that adds definition and depth. Tinted brow gel formulas often contain nourishing botanical ingredients such as Keratin, Gingko Biloba, and Garcinia Mangostana Fruit Extract. These ingredients help condition and strengthen the brows while providing a soft hold. The lightweight, transparent pigment blends naturally into the hairs, offering colour without heaviness or clumps. Tinted gel is ideal for enhancing light, sparse, or uneven brows. It provides flexible hold, fills in small gaps, and gives a smooth, soft tint that lasts throughout the day. Soft Tinted Brows Description / Aim: This method creates a gentle wash of colour and is best for those who prefer a natural, understated look. It subtly darkens the hairs to frame the face without appearing overly defined. Instructions: Start by applying the tinted brow gel to the middle section of your brows, just under the arch. This area is where you want the most depth and fullness. Then, comb the product through to the tail to shape and set the hairs in place. If any formula touches your skin, simply wipe it off with a cotton tip or finger before it dries. When applying to the inner corners near the nose, use a very light hand to avoid closing off the eyes. The goal is to achieve soft, even coverage that enhances your natural brow colour. Sculpted and Defined Brows Description / Aim: For those who love a bold, structured look, tinted brow gel can be used alongside pencils or brow pens. This combination adds shape, colour, and long-lasting definition. Instructions: First, use your brow pencil or pen to outline the shape of your brows and fill in any sparse areas. Then, apply tinted brow gel to groom and set the hairs. Brush through in the same direction as your natural growth to ensure an even finish. The tinted gel adds extra colour and shine, locking your style in place. This method is perfect for achieving well-defined brows that stay put, even through long days or busy schedules. Final Thoughts Brow gels are one of the simplest yet most transformative tools in any makeup routine. Whether you prefer the invisible finish of a clear gel or the added depth of a tinted one, both can instantly lift and define your look. Experiment with different techniques until you find your favourite style. Clear brow gel is perfect for beginners and natural looks, while tinted versions help to create fuller, more sculpted brows. At Mae & Co, we believe brows are personal the best shape or style is the one that makes you feel confident and polished. Frequently Asked Questions 1. Can I use brow gel without any other products? Yes. Brow gel alone can lift and hold your brows in place, making them look neat and structured without the need for pencils or powders. 2. How long does brow gel last once applied? Most formulas offer all-day hold, typically lasting around 12–24 hours depending on the product and your activity level. 3. Should I use clear or tinted brow gel? Clear brow gel is best for a natural or minimal look, while tinted gel adds extra colour and thickness. You can also layer them — clear first for shape, tinted second for depth. 4. Can brow gel help with thin or sparse brows? Yes, especially tinted versions. They can make brows appear fuller by coating each hair and filling small gaps. 5. How do I remove brow gel? Brow gels can be easily removed with your regular facial cleanser or micellar water. Gently wipe with a cotton pad or damp cloth to avoid pulling at the hairs.
Learn more